
In The Beginning…
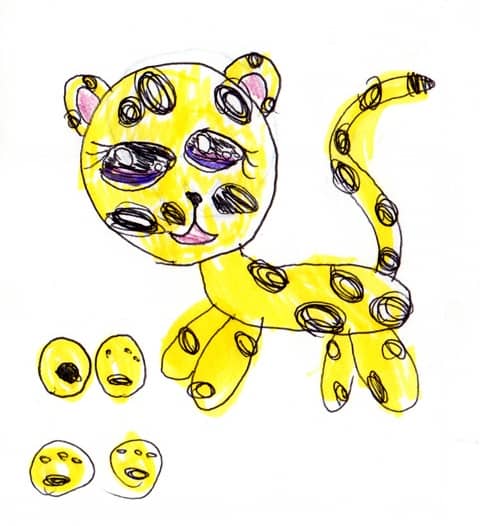
Back in September of 2013, my daughter Sienna approached me about printing her own toys on the Form 1 printer. Sienna was six years old at the time and she was obsessed with Littlest Pet Shop toys. She had about 140 ‘petshops’ so you might think she had every animal in her collection, but she didn’t have her favorite wild animal: the cheetah.
This, according to my daughter, is why 3D printers were invented. Here is the design she presented:
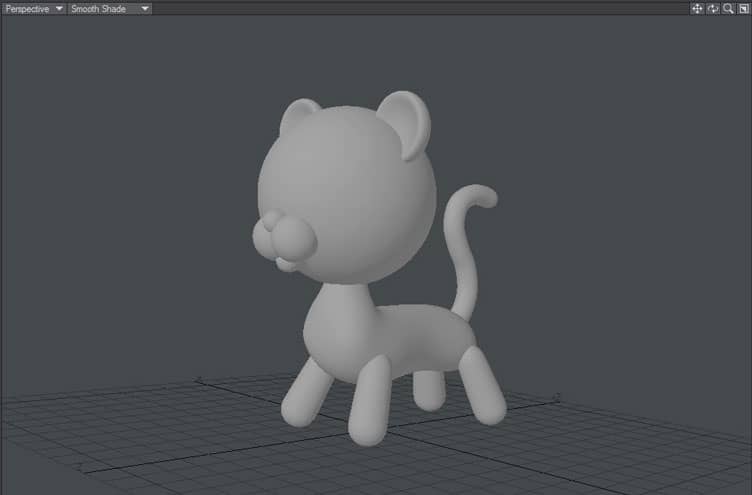
Using a 3D program called LightWave 11.6 Modeler, I helped her block out the figure using primitive shapes. Sienna did some of the modeling but mainly she art directed me to build what she wanted to exacting specifications. That’s okay…as a parent, I’m used to being her tool.

We converted the LightWave object into a voxel-based volumetric object in 3D Coat. Using 3D Coat’s smoothing brush, we blended edges at the joints. Sienna then showed me a lion ‘petshop’ from her collection and asked me to sculpt the mouth of her toy to look like the lion’s. Then we added some definition around the eyeballs and snout.
When Sienna was satisfied with the sculpture, we ran it though 3D Coat’s Autopo process to generate a printable polygonal mesh. Autopo did a decent job retopologizing the surface–the polygon flow for the muzzle and ears turned out surprisingly well. The only really rough bit was the area where the front legs joined the chest. To fix it, I deleted the polys in that region and manually re-meshed it by ‘drawing’ new polygons over the surface of the voxels.

The polygonal mesh was saved as a new .lwo file and then opened in LightWave Modeler. Looking at the Statistics panel, we discovered a couple of 2-point polygons that needed to be deleted. Finally, we checked the object using the Repair Mesh tool and exported an .stl file. For Form 1 compatibility, we chose the Up-Axis to Z option and set the Export Units to millimeters. These settings set the proper orientation and scale for Preform, the Form 1’s printing software.

Here’s Sienna’s cheetah in Preform. We decided to clone the object and print two. Sienna pointed out that there was enough space on the build platform for four cheetahs but I felt two was plenty for our first test.

Here are the cheetahs fully printed. Total print time was about three hours for the two two-inch tall toys.

After a ten-minute soak in an isopropyl alcohol bath, the toys are left out to dry and cure in a window sill.

The supports are snapped off and clipped from one of the cheetahs. A little sanding and filling comes next.

Ready to paint.

We picked up some yellow spray paint and paint markers from a hobby shop. Sienna was eager to get started.

Here she is adding details with the paint markers. Almost done.
When Lasers Go Bad
Shortly after printing the cheetah, our Form 1’s laser went bad. FormLabs replaced the printer promptly. (Thanks guys!) Unfortunately, a bunch other stuff happened (not related to the printer) and Sienna and I had to put aside our ‘petshops’ project for awhile.
Leap forward to 2015, two years later.
FormLabs contacts us with an offer to upgrade to the new Form 1+. The new model has a redesigned resin tray, a stronger laser and an improved galvanometer for increased performance and reliability. On top of that, because we were Kickstarter sponsors, the upgrade is greatly discounted. I bite.
A few weeks after the new printer arrives, Sienna, who is now eight years old, showed me a new toy design and said it was time to pick up where we left off.
To be sure the Form +1 was working properly, we reprinted Sienna’s cheetah toy. We also wanted to test out the Gray resin I bought a year ago. Here’s the Form 1+ cheetah print with gray resin.

It looks beautiful! Here’s a comparison with the Clear printed two years ago.

And here it is next to the original cheetah painted by Sienna two years ago.

You might have noticed that the painted cheetah’s tail go broken. I want to print a new tail so we can fix it.
To make sure our first successful print with the Form 1+ wasn’t a fluke, we tried printing two copies at once:

Bubblicious! Moving on to Sienna’s new design.
Pet Shop 2.0
Here’s Sienna’s new toy design: the fennec fox.

I think her drawings skills have improved a lot.

As before, we started with primitive shapes in LightWave…

…and sculpted the details in 3D Coat.

Not that LightWave isn’t capable of detailed modeling, because it certainly is, but I feel I can get closer to a finished design more quickly using a voxel sculpting program like 3D Coat. In my experience, eight-year-olds have limited patience so I chose the fastest workflow I could think of. After of an hour or so of tweaking in 3D Coate, this was our final sculpt.

And after retopology, the fox is back in LightWave. After checking the mesh, the fox was exported to an .stl file.
The .stl file was then opened in PreForm. It’s worth noting that PreForm has seen a lot of improvements in two years.

Sadly, our first fox print failed. After discussing the failure with FormLabs, we determined that the gray resin I was using had expired. It has a shelf life of a year and they were actually surprised to learn I got the three cheetahs to print with my expired resin. I placed an order for a fresh bottle of Gray v2 resin and put off our project until it arrives.
When the new resin arrived, I thought I should print something small as quick test. A new tail for the old cheetah seemed like just the thing.

It came out perfectly! So the problem must have been expired resin after all.
This part took about 35 minutes to print at the lowest quality setting and I’m amazed by how smooth it looked. According to the printer, the fox was going to take about 2 1/2 hours to print, so I let it run over night.
In the morning, Sienna and I found this waiting for us.

We left the fox to cure while Sienna went to school and I took off for work.

It’s worth noting that leaving a Form 1+ printed part to cure in the sun all day long is not really recommended. It will cure the material but if you leave part in the sun too long, it can become brittle. It’s best to leave the part on the window sill or in a UV box till it loses it’s tackiness, and then spray the part with paint or a clear UV protectant.
When I get home, I remove the supports using a flush cutter and a small Xacto knife. Sienna was very pleased and she couldn’t wait to paint it. Then I dropped it on the floor and it broke. Oops! Too much sun curing, I guess.
Okay, clumsy daddy too.

The next day
Nothing new…it’s just two. I printed this pair overnight at a higher resolution. I had set the print quality to 50 microns. Both foxes together took less than 6 hours to print and they are visibly smoother than the 100 micons print (which was already pretty smooth.)
By this time, Sienna was chomping at the bit to paint her new fennec fox.

So she did.

And In The End…

All done and the two year-old cheetah with the broken tail was nicely repaired too. Sienna has already come up her next designs and she’ll be posting pics of new toys she wants to make soon.


This Post Has 2 Comments
This was cool to see. And makes me wish to consider more on getting my own 3d printer.
I like the gray. I bet it takes to being painted on better.
I wonder how well polishing it by hand with a Dremel would work.
I can see in the picture the stepping through the painting on the fox, on preview 25. Real nice picture of it by the way. Can really see the detail. The stepping is mostly only noticeable on the little piece of neck fur. That part would be hard to smooth by hand.
Thanks Chris.
Yeah it’s been fun. We’ve been active with the printer lately and we hope to have new stuff posted soon.
The gray shows details very nicely but, maybe more importantly, it also reveals flaws that are difficult to see with the transparent material. Either material sands very nicely if you use a micro-fine paper (car paint grade). I did get a small cordless Dremel tool a few months ago and, yes, polishing it very easy with it.
I’ve heard that some users will brush or dab on the resin material over any holes and rough patches, and then use an ultraviolet light to cure it. Once cured, they sand the flaws smooth. I got a UV LED flashlight a couple of weeks ago and will try it out soon. More on that later.
Regarding ‘stepping’: The fox was printed at the lowest quality setting (at the time) or 100 microns. The printer is capable of printing as high as 25 microns. That’s much higher quality (about 1/4 the thickness of hair,) but very slow at that res–four times longer in fact. Sienna has been pretty happy with the ‘low’ setting and, TBH, it is hard to see the ridges when it’s painted over (you really have to look for it). When ridging is an issue at this res, I find that leaving it in the alcohol bath longer has the effect of smoothing it further.
For my own stuff, I’ve been using 50 microns, which is a good compromise for quality and speed. I’ll try to post some stuff once I get them painted.
Recently Form Labs added ‘draft’ mode to the printer software, which is 200 microns. This mode only works with Clear I think. It’s a lower res but it’s supposed to be very fast. Good for prototyping your prototypes I guess. 🙂
I’ll write more info about printing and finishing tricks in a future article.
By the way, Formlabs has a crazy new material they simply call Tough Resin. I’ve seen videos of one user bashing a TR part with a hammer and squashing it in a bench vice. The hammer didn’t seem to do much to it, and the vice managed to tear it a little bit but that was all. This material is more expensive but I’m thinking of setting some money aside for it so I can print replacement parts for a few broken things around the house, and for some gadgets I’ve been thinking about. We still have some Gray to finish up though, so it may be a little while off.
Thanks for posting!